Project Euler .NET のProblem 20について
”100!の各桁の和を計算せよ”とのことだがC#でごり押しで書いていくと何とか計算できた。もっと簡単にできる方法があるに違いないと思い問題を解いた後にググッてみるとJ#にBigIntegerなるクラスがあることを知る。おう、無駄な努力をしてしまった。下がBigIntegerを使用して書いたコード。
// 参照設定にvjslib.dllを追加しておく

java.math.BigInteger num = new java.math.BigInteger("1");
for (int i = 1; i <= 100; ++i) {
	num = num.multiply(new java.math.BigInteger(i.ToString()));
}

string strNum = num.ToString();
int sum = 0;
for (int i = 0; i < strNum.Length; ++i) {
	string str = strNum.Substring(i, 1);
	sum += int.Parse(str);
}組み込み型の範囲を超えるような大きな数値計算を今までしたことが無かったので、このあたりのことを調べてわかったことを以下に記述
・現状、C#のライブラリにはBigIntegerのような大きな計算を行えるクラスがないので、vjslib.dll(J#)のBigIntegerクラスを利用するか、Code Projectにある有志の人が作ったクラスを利用するしかない。
・Visual Studio 2010/.NET 4.0 でBigIntegerがサポートされる
Project Euler .NET のProblem 18について
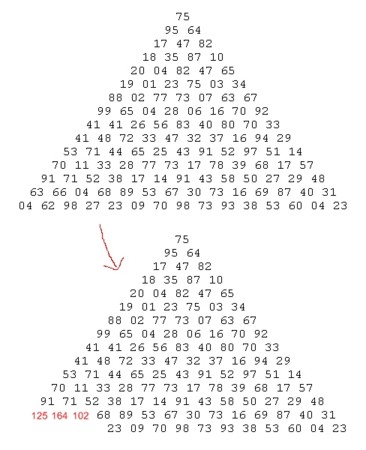
結構悩んだ。暫く眺めていると三角形の底辺から順に値が大きくなるように値を覚えていけばよいことに気づいた。例えば三角形の左下の角辺りにある63という数字のある場所を経路とする場合,その下の右下の62という場所を必ず通る。この場所を63+62=125という数字のある場所と考えれば、下の2経路について考える必要は無くなる。同じように63という数字のある場所の隣の場所も66+98=164という数字のある場所と考えれば下の2経路について考える必要は無くなる。これを同じ列の全てに対して処理を行うと列が1段少なくなった三角形ができる。あとは同じように繰り返していくと段々列が無くなり、三角形の頂点のみが残る。そのときの値が最大値となる

以下ソースコード
List<List<int>> triangleList = new List<List<int>>();

// ファイルから数字を取り出している
using (StreamReader sr = new StreamReader("data2.txt")) {
	string str = "";
	while ((str = sr.ReadLine()) != null) {
		IEnumerable<int> list = from element in str.Split(' ')
								select int.Parse(element);
		triangleList.Insert(0, list.ToList<int>()); // 三角形の最下段がリストの一番最初に来るようにしている
	}
}

List<int> sumList = triangleList[0];
int downLeftNum, downRightNum;
int maxNum;

for (int i = 1; i < triangleList.Count; ++i) {
	List<int> list = triangleList[i];
	List<int> tmpSumList = new List<int>();
	for (int j = 0; j < list.Count<int>(); ++j) {
		downLeftNum = sumList.ElementAt<int>(j);
		downRightNum = sumList.ElementAt<int>(j + 1);
		maxNum = (downLeftNum >= downRightNum) ? downLeftNum + list.ElementAt<int>(j) : downRightNum + list.ElementAt<int>(j);
		tmpSumList.Add(maxNum);
	}
	sumList = tmpSumList;
}

int maxVal = sumList.ElementAt<int>(0);
Project Euler .NET のProblem 8について
Find the greatest product of five consecutive digits in the 1000-digit number.
productの意味には"積"の意味があるみたい。
下記のサイトのPHPのコードを見ると掛け算しているし。
XAMLでオーナードローボタン(カスタムドローボタン)の作成
XAMLではもはやオーナードローボタンとかいう言い方はしないかもしれないが作成方法について。
MSDNの”ボタン ControlTemplate の例”に載っているソースコードを下記の場所に全てコピペする
<Application.Resources>
	<ResourceDictionary>
		<!-- ここにソースコードをを全てコピペする -->
	</ResourceDictionary>
</Application.Resources>
あとは必要な箇所を変更すれば良いだけなのだが、MSDNに載っているコードの大部分はブラシの定義なので{StaticResource ・・・}の箇所をYellowとかBlueとかにすればもっとすっきりする。下記は変更したコード。x:Key="brushButton"となっている箇所はブラシによるオーナードローで、x:Key="imageButton"となっている箇所は画像ファイルによるオーナードロー。
	<Application.Resources>
		<ResourceDictionary>

			// ボタンをBrushで表示
			<Style TargetType="Button" x:Key="brushButton">
				<Style.Setters>
					<Setter Property="Width" Value="90"/>
					<Setter Property="Height" Value="20"/>
					<!-- TemplateBinding Property=Background としているのでこの色が使用される -->
					<Setter Property="Background" Value="Red"/>
					<!-- フォーカスを表示しないようにしている -->
					<Setter Property="FocusVisualStyle" Value="{x:Null}"/>
                    			<!--
					<Setter Property="FocusVisualStyle">
						<Setter.Value>
							<Style></Style>
						</Setter.Value>
					</Setter>
                    			-->
					<Setter Property="Template">
						<Setter.Value>
							<ControlTemplate TargetType="Button">
								<Border x:Name="Border" CornerRadius="0" BorderThickness="0" Background="{TemplateBinding Property=Background}">
									<Border.Child>
										<ContentPresenter HorizontalAlignment="Center" VerticalAlignment="Center" RecognizesAccessKey="True"/>
									</Border.Child>
								</Border>

								<ControlTemplate.Triggers>
									<Trigger Property="IsKeyboardFocused" Value="true">
									</Trigger>
									<Trigger Property="IsDefaulted" Value="true">
									</Trigger>
									<Trigger Property="IsMouseOver" Value="true">
										<Setter TargetName="Border" Property="Background" Value="yellow" />
									</Trigger>
									<Trigger Property="IsPressed" Value="true">
										<Setter TargetName="Border" Property="Background" Value="blue" />
									</Trigger>
									<Trigger Property="IsEnabled" Value="false">
										<Setter TargetName="Border" Property="Background" Value="gray" />
										<Setter Property="Foreground" Value="white"/>
									</Trigger>
								</ControlTemplate.Triggers>
							</ControlTemplate>
						</Setter.Value>
					</Setter>
				</Style.Setters>
			</Style>


			// ボタンをイメージで表示
			<Style TargetType="Button" x:Key="imageButton">
				<Style.Setters>
					<Setter Property="Width" Value="90"/>
					<Setter Property="Height" Value="20"/>

					<!-- フォーカスを表示しないようにしている -->
					<Setter Property="FocusVisualStyle" Value="{x:Null}"/>
					<!--
					<Setter Property="FocusVisualStyle">
						<Setter.Value>
							<x:Null/>
						</Setter.Value>
					</Setter>
					-->
					<!--
					<Setter Property="FocusVisualStyle">
						<Setter.Value>
							<Style></Style>
						</Setter.Value>
					</Setter>
					-->


					<Setter Property="Template">
						<Setter.Value>
							<ControlTemplate TargetType="Button">
								<Grid>
									<Image x:Name="image" Source="image/normal.png"/>
									<ContentPresenter HorizontalAlignment="Center" VerticalAlignment="Center"/>
								</Grid>

								<ControlTemplate.Triggers>
									<Trigger Property="IsKeyboardFocused" Value="true">
									</Trigger>
									<Trigger Property="IsDefaulted" Value="true">
									</Trigger>
									<Trigger Property="IsMouseOver" Value="true">
										<Setter TargetName="image" Property="Source" Value="image/focus.png" />
									</Trigger>
									<Trigger Property="IsPressed" Value="true">
										<Setter TargetName="image" Property="Source" Value="image/select.png" />
									</Trigger>
									<Trigger Property="IsEnabled" Value="false">
										<Setter TargetName="image" Property="Source" Value="image/disable.png" />
										<Setter Property="Foreground" Value="white"/>
									</Trigger>
								</ControlTemplate.Triggers>

							</ControlTemplate>
						</Setter.Value>
					</Setter>
				</Style.Setters>
			</Style>
		</ResourceDictionary>
	</Application.Resources>
このボタンを使用するには下記のようにすれば良い
<Button Style="{StaticResource imageButton}">imageButton</Button>余談としてIsPressedのカスタム処理はControlTemplateを使用しないと無理っぽい。ControlTemplateを使用すると必要な処理は全て記述しなくてはいけないので上記のソースコードのように長たらしくならざるを得ない。
参照
http://msdn.microsoft.com/ja-jp/library/ms753328(VS.80).aspx
http://blogs.wankuma.com/kazuki/archive/2007/10/24/103981.aspx
XAMLにてImageコントロール内に画像を表示する
プロジェクトファイルのあるディレクトリにimageフォルダがあり、そのフォルダ内にtest.jpgがあるとした場合
①ソリューションエクスプローラにimageフォルダを作成し、追加、既存の項目よりtest.jpgを入れる
②test.jpgファイルのプロパティでビルドアクションをResource、出力ディレクトリにコピーをコピーしないを設定
③下記のようにImageオブジェクトのSourceプロパティに画像ファイルへのパスを設定する
注意する点として
・imageフォルダを作成しないでプロジェクトファイルのあるディレクトリにtest.jpgをそのまま置いて上記の設定を行った場合、デザインウインドウで画像が表示されない
ジェネリックなデリゲートの使い方
下記はList
void MyAction(int x) {
	Console.WriteLine(x);
}

int[] data = { 9, 2, 12, 17, 8, 1, 19 };
List list = new List(data);

// 使い方その1
Action myActionDelegate = new Action(MyAction);
list.ForEach(myActionDelegate);

// 使い方その2
Action myActionDelegate = MyAction;
list.ForEach(myActionDelegate);

// 使い方その3
list.ForEach(MyAction);

// 使い方その4
list.ForEach(Console.WriteLine);

// 使い方その5
list.ForEach(delegate(int x) { Console.WriteLine(x); } );
使い方その4は一瞬、ん?とか思ってしまうが確かにできる・・・。
参照
http://www.atmarkit.co.jp/fdotnet/special/generics02/generics02_01.html
Resources.resxファイルに埋め込んだ画像ファイルをImageオブジェクトに突っ込む
Streamを使用するならResources.resxファイルに画像ファイルを埋め込んでおく必要性があまり感じない・・・。
これもゴチャゴチャしているので何とかなら無いものか
	System.Drawing.Bitmap gifBitmap = Properties.Resources.numericExpression01;		// gif
	MemoryStream memoryStream = new MemoryStream();
	gifBitmap.Save(memoryStream, System.Drawing.Imaging.ImageFormat.Gif);
	BitmapDecoder decoder = new GifBitmapDecoder(memoryStream, BitmapCreateOptions.None, BitmapCacheOption.Default);
	BitmapSource bitmapSource = decoder.Frames[0];


	Image simpleImage = new Image();
	simpleImage.Width = bitmapSource.Width;
	simpleImage.Height = bitmapSource.Height;
	Canvas.SetLeft(simpleImage, 10);
	Canvas.SetTop(simpleImage, 10);
	simpleImage.Source = bitmapSource;
上記はnumericExpression01がgifの場合であり、bmpなら下記のようにする
	System.Drawing.Bitmap bmpBitmap = Properties.Resources.numericExpression01;		// gif
	MemoryStream memoryStream = new MemoryStream();
	gifBitmap.Save(memoryStream, System.Drawing.Imaging.ImageFormat.Bmp);
	BitmapDecoder decoder = new BmpBitmapDecoder(memoryStream, BitmapCreateOptions.None, BitmapCacheOption.Default);
	BitmapSource bitmapSource = decoder.Frames[0];